Manga Speech Bubble Generator
Add manga speech bubbles to your comic panels — drag, resize, done
YarnSaga includes a full manga speech bubble editor built into the comic creator. Add speech bubbles, thought balloons, shout bubbles, and narration boxes directly on your panels. Drag them anywhere, resize them, and edit the text — all without leaving your story. Dialogue is stored separately from the panel image, so you can fix a typo without regenerating the art.
- Speech bubbles, thought balloons, shout/scream bubbles, and narration boxes
- Drag anywhere on the panel — resize to fit any layout
- Edit dialogue without regenerating panel art
Made with YarnSaga
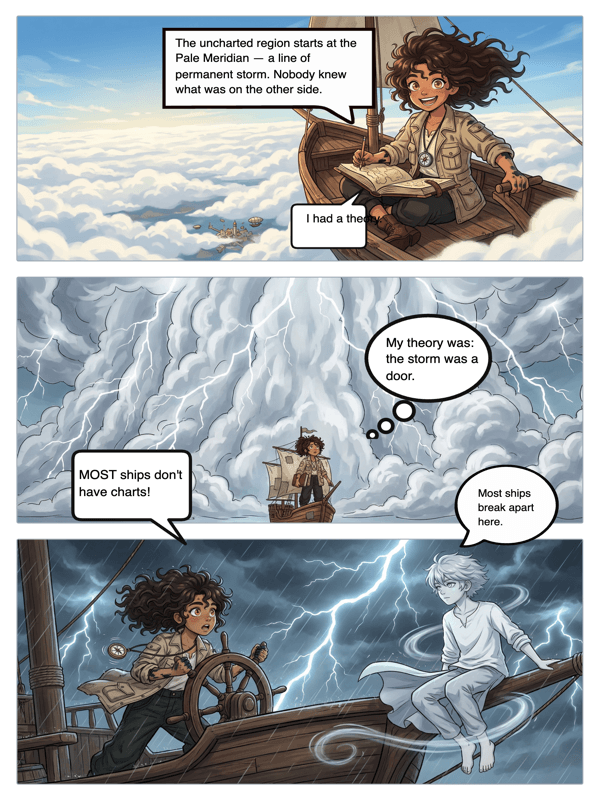
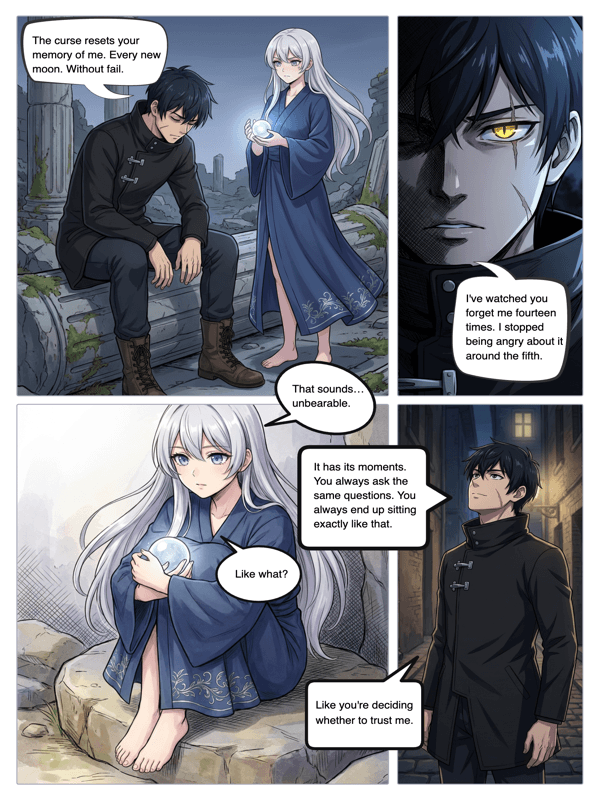
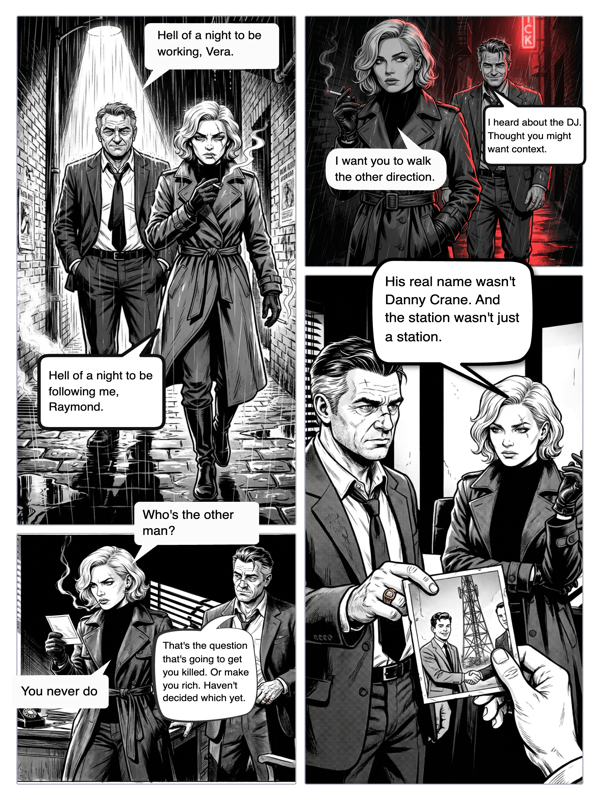
Real output from YarnSaga — characters stay consistent across every panel
How it works
Generate your comic panel
Write your scene description and generate the panel art in your chosen manga or comic style. YarnSaga creates the image — characters, background, lighting — all in one generation.
Add speech bubbles
Open the bubble editor. Choose your bubble type: speech, thought, shout, or narration. Click to place it on the panel. Drag it to the right position over your character.
Type your dialogue and publish
Type the dialogue directly into the bubble. Resize it to fit. Repeat for each character speaking. When the page is done, publish your story and share the link.
What you get
Four bubble types
Speech bubbles for dialogue, thought balloons for inner monologue, shout/scream bubbles for action moments, and rectangular narration boxes for captions. Each signals a different kind of text to the reader.
Drag-and-drop placement
Click anywhere on the panel to place a bubble. Drag it to the exact position you want. The bubble tail points toward the speaking character automatically based on placement.
Dialogue stored separately from art
Your speech bubble text is stored independently of the panel image. Fix a typo, rewrite a line, or change the dialogue entirely — without regenerating the artwork. This is how professional comic tools work.
Works across all art styles
Speech bubbles work on every YarnSaga art style — manga, webtoon, noir, superhero, Studio Ghibli, and all others. The bubble styling adapts to match the visual register of your comic.
Unlimited bubbles per panel
Add as many bubbles as a panel needs. Multi-character conversations, overlapping dialogue, internal thought combined with spoken words — no limit per panel.
No design software needed
Everything happens inside YarnSaga — generate the panel, add bubbles, publish the page. No exporting to Photoshop, no separate design tool, no manual compositing.
Who uses this
Manga and webtoon creators
Dialogue is half of storytelling. Place manga-style speech bubbles directly on generated panels and build complete chapters with real conversation — not just illustrated scenes.
Writers turning scripts into comics
You have the dialogue already written. YarnSaga generates the art and then lets you place every line exactly where it belongs in each panel — without involving a letterer.
Comic creators who hate re-exporting
Change a character's line after the art is done — without regenerating anything. Dialogue is stored separately, so edits are instant.
Common questions
What types of speech bubbles does YarnSaga support?
YarnSaga supports four bubble types: standard speech bubbles (oval with a tail for dialogue), thought balloons (cloud-shaped for inner monologue), shout/scream bubbles (spiky edges for exclamations and action), and narration boxes (rectangular captions for scene-setting text).
Can I edit the dialogue without regenerating the panel art?
Yes. Dialogue is stored completely separately from the panel image. You can edit, rewrite, or delete text in any bubble at any time without touching the artwork.
How do I position the speech bubble tail toward the right character?
Drag the bubble to the position closest to your character. The tail direction adjusts based on where the bubble sits relative to the panel. For precise control, place the bubble directly adjacent to the speaking character.
Can I add multiple speech bubbles to one panel?
Yes, there is no limit. Add as many bubbles as the panel requires — multiple characters speaking, a character with both spoken dialogue and an internal thought bubble, stacked narration captions.
Do speech bubbles appear in the published story?
Yes. When you publish your story, speech bubbles appear as overlays on top of the panel images, exactly as positioned in the editor. Readers see the full illustrated panel with dialogue.
Is this free to use?
Speech bubbles are included with all YarnSaga plans, including the free starting credits. Generating panel art costs credits; adding speech bubbles to existing panels is free.
Ready to make your comic?
Free to start. No drawing skills needed. Your characters stay consistent — automatically.
Start free